
The lunge test is a weightbearing test for the ankle joint range of motion.
The lunge test for ankle dorsiflexion is a simple assessment used to measure the range of motion (ROM) in ankle dorsiflexion. It helps evaluate the flexibility and mobility of the ankle joint. Here’s how the test is performed:
- Preparation: Find an open space where you can take a step forward comfortably. You may also need a measuring tool, such as a ruler or measuring tape, to quantify the range of motion.
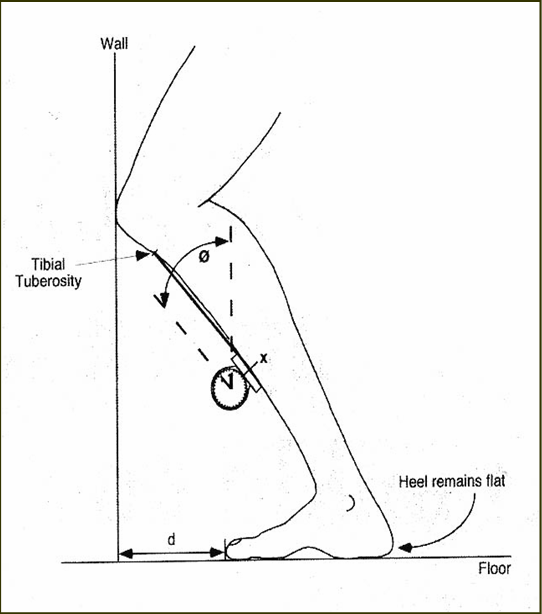
- Starting Position: Stand facing a wall or a sturdy surface, with your feet shoulder-width apart. Place one foot approximately one foot length away from the wall, positioning it so that your toes are slightly elevated.
- Test Execution: Keeping your heel on the ground, bend your knee and try to touch the wall or the surface in front of you with your knee. Maintain an upright posture and avoid lifting your heel or letting it roll inward.
- Measurement: Measure the distance between the wall or surface and the tip of your big toe. This measurement represents the amount of ankle dorsiflexion achieved during the test.
- Repeat: Perform the test with the other foot as well to assess both ankles.
Interpreting the Results:
The lunge test provides a quantitative measure of ankle dorsiflexion. The normative values for ankle dorsiflexion can vary depending on the individual and the specific requirements of their activities. However, generally, a range of 10-15 centimeters (or approximately 4-6 inches) is considered normal for the lunge test.
If an individual demonstrates less than the desired range, it may indicate limited ankle dorsiflexion or tightness in the calf muscles or other structures around the ankle. This restriction can have implications for functional activities such as walking, running, squatting, or participating in sports that require adequate ankle mobility.
The lunge test is a simple screening tool and should not be used as the sole diagnostic tool. If you have concerns about your ankle mobility or if you experience pain or limitations in your daily activities, it is recommended to consult with a healthcare professional, such as a physical therapist or orthopedic specialist, who can perform a comprehensive evaluation and provide appropriate treatment or further assessment if needed. They can also guide you with specific exercises and interventions to improve ankle mobility and address any underlying issues.
FAQs about the Lunge Test
What is the lunge test for the ankle joint?
The lunge test (Weight-Bearing Lunge Test or Knee-to-Wall Test) is a functional clinical assessment of ankle dorsiflexion range of motion (ROM) in a closed-chain, weight-bearing position. The person faces a wall, places one foot flat on the floor pointing forward, and lunges the knee toward the wall while keeping the heel firmly on the ground. The maximum distance (or angle) at which the knee can touch the wall without the heel lifting is measured. It evaluates functional ankle mobility more relevant to activities like squatting, walking, running, and stair descent than non-weight-bearing goniometry.
How do you perform the lunge test correctly?
- Stand facing a wall with the test foot flat on the floor, toes pointing straight ahead (second toe aligned with the center of the heel for neutral position).
- Place the other foot comfortably behind for balance.
- Lunge the front knee forward toward the wall, keeping the heel fully in contact with the floor and the knee tracking over the second toe (avoid collapsing inward or rotating the foot).
- Adjust the foot position: move farther from the wall if the knee touches easily with heel down; move closer if the heel lifts before contact.
- Find the maximum distance where the knee just touches the wall with the heel still down.
- Measure the distance from the tip of the longest toe (usually the big toe/hallux) to the wall, or use an inclinometer on the anterior shin for the tibial angle.
- Repeat on the other side for comparison.
Key form points: no external rotation of the foot, no heel lift, and consistent technique for reliability.
What does a “normal” or good result look like?
Practical field guidance commonly cites approximately 10 cm or more toe-to-wall distance as good functional dorsiflexion.
- Moderate: roughly 6–9 cm.
- Restricted: under 6 cm (or sometimes cited as under ~10 cm / 4 inches depending on the source).
Some sources note ≥12.5 cm (5 inches) or a one-hand width as a rough normal, and corresponding tibial angles around 35–40°+ for functional tasks. Norms vary by age, sex, and activity level—recent larger studies provide age- and sex-stratified reference values, with slight decreases often seen with older age. Side-to-side differences greater than ~2–3 cm are often considered clinically noteworthy, especially if linked to symptoms.
How is the result measured and which method is best?
Common methods:
- Tape measure: distance from longest toe to the wall (simple, highly reliable).
- Inclinometer: angle of the tibia/shin relative to vertical.
- Goniometer at the lateral ankle (less commonly preferred for this test).
Studies show the tape-measure distance and anterior-shin inclinometer methods have high reliability and consistency. A rough conversion is about 1 cm ≈ 3.6–4.1 degrees. Always use the same method for serial measurements.
Is the test reliable?
Yes. The Weight-Bearing Lunge Test demonstrates excellent intra-rater reliability (ICC often >0.97) and very good inter-rater reliability (ICC typically >0.90). The minimal detectable change (MDC) is roughly 1–2 cm (or ~1.5–1.9 cm in many reports), meaning changes larger than this are likely real rather than measurement error.
What causes a restricted (poor) result?
Common contributors include:
- Tight calf musculature (gastrocnemius/soleus).
- Joint restrictions or stiffness at the talocrural joint.
- Soft-tissue limitations, previous injury/scarring, or bony impingement.
- Compensations involving the subtalar joint or midfoot if form is poor.
Anterior pinching or blocked sensation during the test may suggest intra-articular or impingement issues rather than pure soft-tissue tightness. The test itself does not diagnose the exact cause.
Why is this test preferred over non-weight-bearing goniometry?
It assesses dorsiflexion under load in a functional position that better reflects real-world demands (e.g., gait, squatting, landing). Non-weight-bearing measures often underestimate available ROM and have lower functional relevance. Weight-bearing testing also accounts for body weight and neuromuscular control to some degree.
Can the test diagnose specific ankle pathologies?
No. It quantifies available weight-bearing dorsiflexion ROM and can highlight asymmetry or restriction, but it does not diagnose the underlying pathology (e.g., ligament injury, osteochondral lesion, or specific soft-tissue vs. bony restriction). It is best used alongside history, other tests, palpation, functional movement assessment, and imaging when indicated.
Should both sides always be tested?
Yes. Bilateral comparison is highly useful for detecting asymmetry, which may be more clinically meaningful than absolute values alone, particularly when symptoms or movement compensations are present.
What are common mistakes or ways people “cheat” the test?
- Allowing the heel to lift.
- Externally rotating the foot or letting the heel roll inward (using subtalar/midfoot motion).
- Letting the knee collapse medially instead of tracking over the second toe.
- Inconsistent foot placement or measurement landmarks.
- Not ensuring the heel remains fully planted throughout.
Proper monitoring of form is essential for valid results.
How can restricted results be improved, and how much change is meaningful?
Interventions often include calf stretching/soft-tissue work, joint mobilizations (if joint restriction is present), and progressive loading exercises. Foam rolling, specific mobility drills, and addressing kinetic-chain factors may help. A change of approximately 1.5–2 cm (or greater than the MDC) is typically needed to exceed measurement error and indicate true improvement. Retest periodically with the same method.
Are there variations of the test?
Yes. Some versions assess the rear foot with the knee extended (to help differentiate gastrocnemius tightness) versus the front foot with the knee flexed. Measurement tools and exact starting positions can also vary slightly. Consistency within a clinic or across sessions is more important than the exact variant chosen.
This test is widely used by physiotherapists, sports medicine clinicians, podiatrists, and coaches because of its simplicity, reliability, and functional relevance. Always interpret results in the full clinical context rather than relying on a single cutoff.